Manage Tesla climate control system using PowerShell
Challenge
![]()
Tesla’s vehicles has a climate control system which can be remotely managed from the company`s mobile app.
Many Tesla owners use this to pre-heat or pre-cool the cabin remotely before using the car.
A frequently requested but missing feature is the ability to schedule the state of the climate control system.
Solution
Since this article probably will be read by a less technical audience than what I expect for other articles on this blog, I will start by giving some definitions for relevant parts of the proposed solution.
PowerShell
![]()
PowerShell (including Windows PowerShell and PowerShell Core) is a task automation and configuration management framework from Microsoft, consisting of a command-line shell and associated scripting language built on the .NET Framework.
Source: Wikipedia
PowerShell was previously available on Windows only, but last year Microsoft made PowerShell open source and available on both Linux and MacOS. The Linux and MacOS versions is still in preview, but the Windows version has been built-in to Windows since Windows 7.
Scheduled task
Task Scheduler is a component of Microsoft Windows that provides the ability to schedule the launch of programs or scripts at pre-defined times or after specified time intervals.
Source: Wikipedia
This means that a PowerShell script can be scheduled to run at pre-defined intervals, which is what we want to accomplish in this article.
Azure Automation
![]()
Microsoft Azure Automation provides a way for users to automate the manual, long-running, error-prone, and frequently repeated tasks that are commonly performed in a cloud and enterprise environment. It saves time and increases the reliability of regular administrative tasks and even schedules them to be automatically performed at regular intervals. You can automate processes using runbooks. A runbook is a set of tasks that perform some automated process in Azure Automation.
Source: Microsoft
Azure Automation has a free plan which gives you 500 minutes of runbook execution time per month,
which should be more enough for the task we are trying to solve in this context.
The main benefit of using Azure Automation in this context is that we can schedule a PowerShell
script to accomplish a task without being dependent on a computer being powered on at the time the scheduled task is configured to run.
Controlling your Tesla vehicle from PowerShell
PowerShell can be extended by installing modules which adds commands for a specific
task or product. You can think of the PowerShell Gallery as an “app-store” for
PowerShell, and makes it very convenient to add new modules by simply running a command.
1. Start PowerShell (on Windows 7 - 10)
Simply press the Start button and search for “PowerShell”. You will likely get two hits:
“Windows PowerShell” and “Windows PowerShell ISE”. The first one is a command console while
the PowerShell ISE also has a script editor. If you’re a beginner it might be easier
to start with the PowerShell ISE, as it provides helpful features such as IntelliSense.
It also has a script editor, which is useful when building a script which we will do
in this article.
2. Allow PowerShell scripts to be executed
PowerShell has a feature called “execution policy” which by default is set to “Restricted”,
meaning that no scripts is allowed to run. In the context of this article, I will recommend
to set the execution policy to “RemoteSigned”. This means that you can run scripts locally
without having to sign it with a digital signature.
Run the following command to configure the execution policy:
Set-ExecutionPolicy RemoteSigned
Make sure you start PowerShell with “Run As Administrator” before running the command.
3. Install the Tesla module for PowerShell
A PowerShell module created by Jon Newman makes it possible to run PowerShell commands
which uses the same API as when using the Tesla mobile app and controlling the vehicle
from mytesla.com. If you are interested in the technical details, you can find more
information in the module’s GitHub repository.
The module is available from the PowerShell Gallery, meaning we can install it by simply running the following:
Install-Module -Name Tesla
If this is the first time you run this command, you will be prompted to install NuGet which is being
used under the hood to interact with the PowerShell Gallery. Answer Yes when prompted to install
this prerequisite. Next, you will be warned that the PowerShell Gallery by default is configured
as an untrusted source. Answer Yes to acknowledge this and install the module.
Now the module is installed and is ready to be used.
Here is an example on how to explore the available commands and authenticate using your MyTesla
credentials:
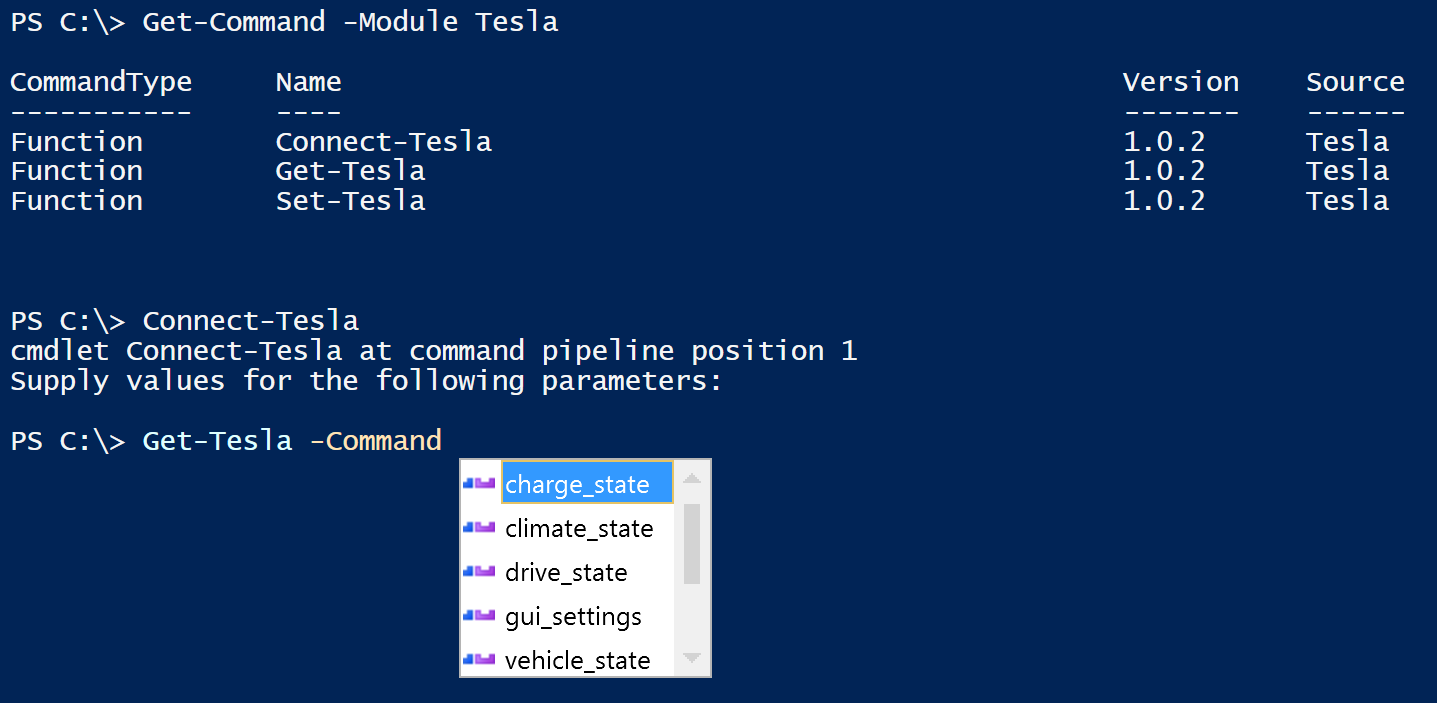
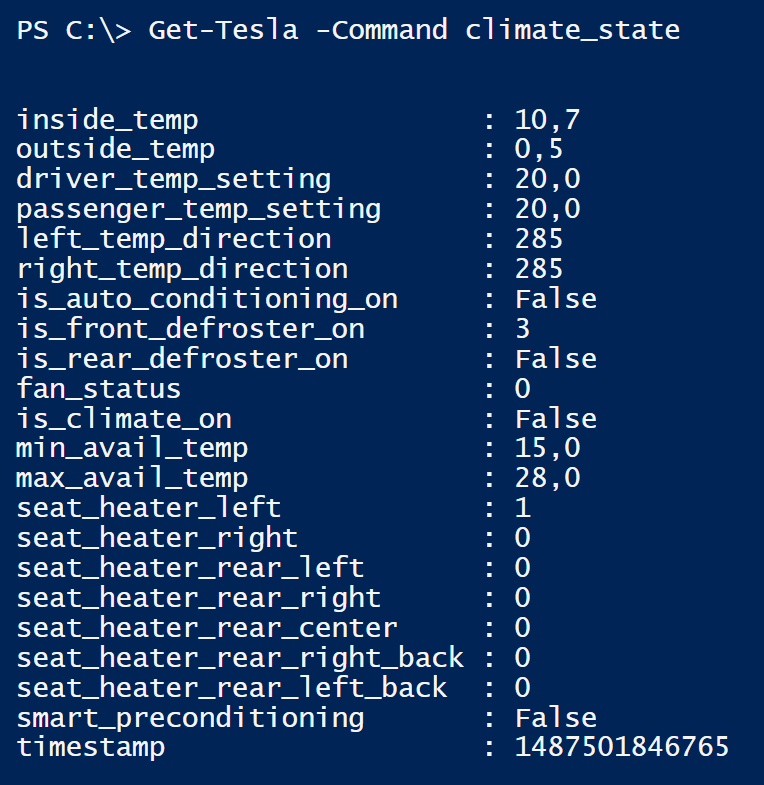
Next, we can run the API command climate_state to get the current climate settings:
Here we can see that we have two API calls for starting and stopping the auto conditioning:
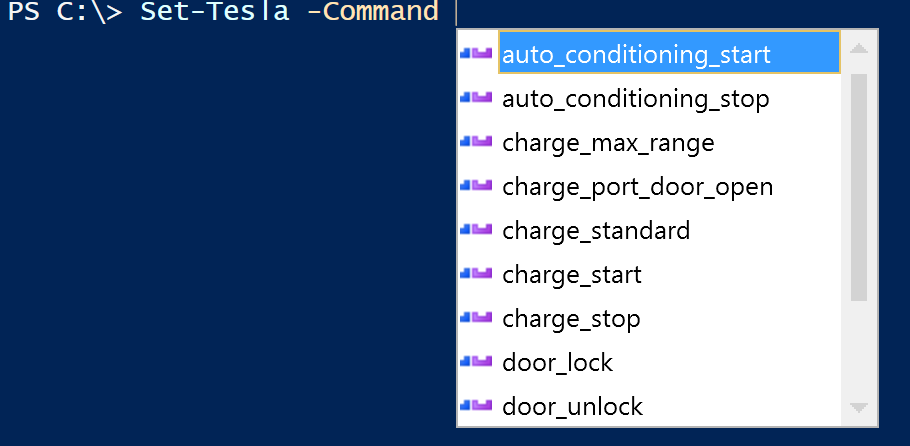
Based on what we have seen so far, we have enough information to create a simple script to start and stop auto conditioning:
Since we are using PowerShell, only the imagination can limit what criterias we can use before
executing a command such as starting or stopping heating. For example, we could connect to the Office 365
REST API to get calendar events
and use that as a criteria in our script (only start heating if we have a calendar event with a subject
containing the word Tesla in it during the next 3 hours.)
Another example: We have already seen how we can get information about the current climate state from
the vehicle including the outside temperature.
This means we can use logic in PowerShell’s scripting language for starting heating only if the
outside temperature is below a given value:
I have created a repository on GitHub for storing examples on how you can use
PowerShell to manage your Tesla vehicle.
This will be updated over time with more examples, and hopefully others will contribute
as well. If you have any suggestions for new features, feel free to submit an issue
on the GitHub repository.
Scheduling the PowerShell script
When you have created a script for triggering the climate control system, the last piece is to make
it run on a schedule. There is a number of options to choose from:
Option 1 - scheduled task in Windows
This is very easy to setup, but it requires the computer it’s configured to run on to be powered on
at the time the scheduled task will run.
Although it is possible to hard code credentials for your MyTesla account in clear-text in the script,
this is not something I would recommend so I won’t even show how to do it that way.
The way I recommend is to simply create a PowerShell credential object using the native Get-Credential
command:
$MyTeslaCredential = Get-Credential
You can then export that object to a file:
$MyTeslaCredential | Export-Clixml -Path C:\Scripts\MyTesla.cred.xml
The credential will be encrypted using the DPAPI in Windows, meaning it can only be decrypted by the
same user on the same computer as it was encrypted on.
This can be imported in the script you are going to schedule by running:
$MyTeslaCredential = Import-Clixml -Path C:\Scripts\MyTesla.cred.xml
This object can be fed into the Connect-Tesla command:
Connect-Tesla -Credential $MyTeslaCredential
This way, we can authenticate to the MyTesla API unattended.
Update 2017-02-21: The PSTesla module author notified me that the module does support persistent credentials, more info here
Now that you know how to setup credentials for MyTesla, you can proceed to creating the scheduled task:
1) Run through step 1-3 in the section “Controlling your Tesla vehicle from PowerShell” on the computer
you want to run the scheduled task from.
2) Create a .ps1-file with the script you want to schedule and store it locally, for example as C:\Scripts\Start-TeslaHeating.ps1.
If you don’t want to start from scratch you may copy and optionally customize the script you want
to use from my Git repository
3) Create and export credentials for your MyTesla account as described above
4) Run the script manually once to make sure it works
5) Create a scheduled task to run the script on the schedule you want, for example weekdays at 7 AM.
Option 2 - runbook in Azure Automation
1) Create an Azure account if you don’t have one (it`s free)
2) Create an Azure Automation account if you don’t have one. To do this, login to portal.azure.com
and find Automation Accounts in the menu on the left (you might need to go to More services at the
bottom and search for it). At this point you should be presented with the frontpage for your
Automation Account:
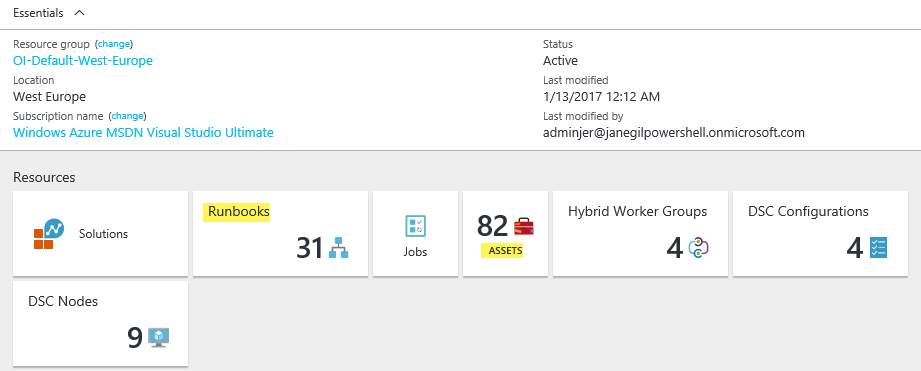
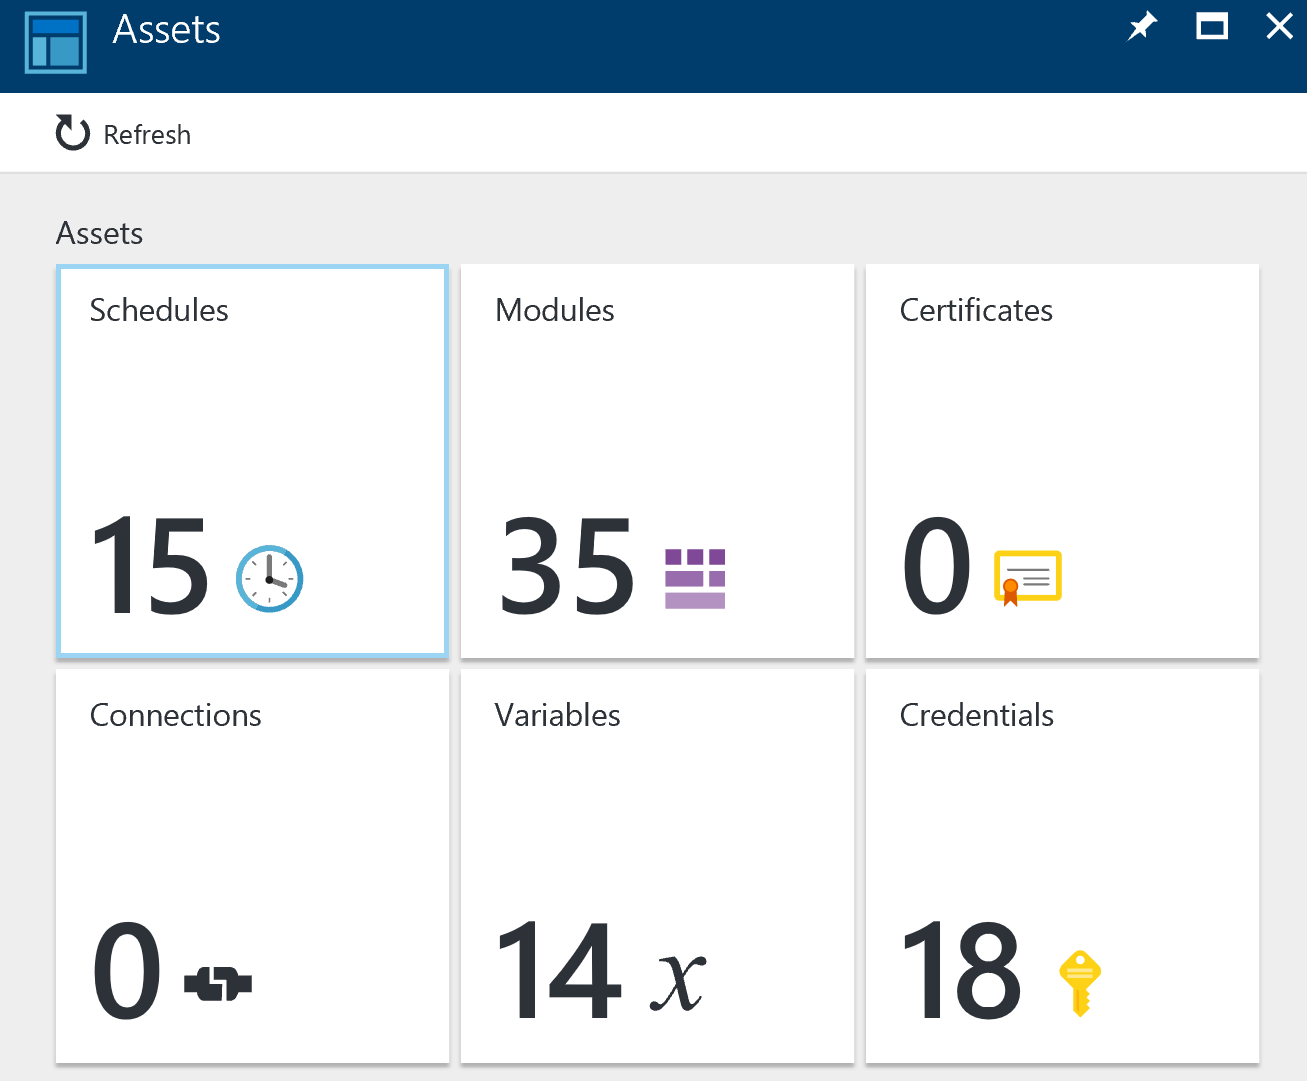
In this context we are going to leverage 2 of the available options: Runbooks and Assets.
3) Go into Assets:
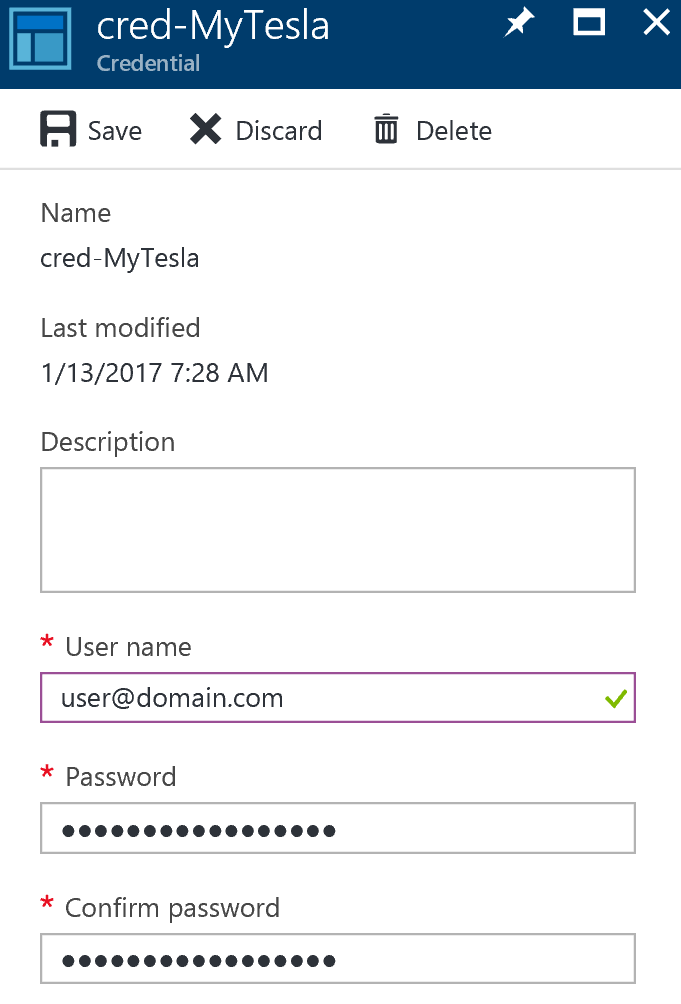
4) Go into Credentials.
Click Add a credential at the top and create a credential asset for your MyTesla account.
Remember the name of the asset, as we need to specify the name in the runbook we will create next.
5) Create the runbook:
- Go back to the frontpage of your Automation account and click on the Runbooks item.
- Click Add a runbook->Create a new runbook.
- Give it a meaningful name and choose PowerShell as the Runbook type.
- In the editor that shows up, paste the PowerShell script you want to schedule.
- If you don’t want to start from scratch you may copy and optionally customize the script you want
to use from my Git repository - To leverage the credential asset we created in step 4, add this line to your script:
$MyTeslaCredential = Get-AutomationPSCredential -Name cred-MyTesla
cred-MyTesla is the name you specified in step 4. - Click Save and then Publish after the script is pasted and customized.
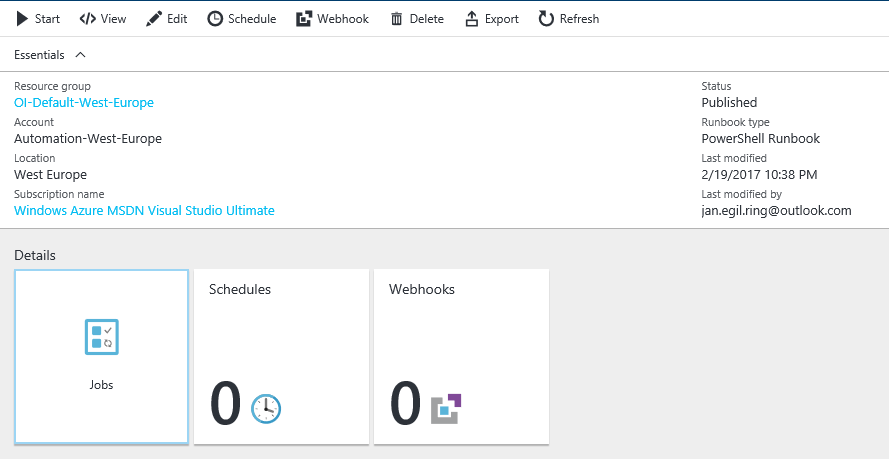
6) You should now be on the main page for your new runbook:
Click on Schedules->Add a schedule->Link a schedule to your runbook->Create a new schedule:
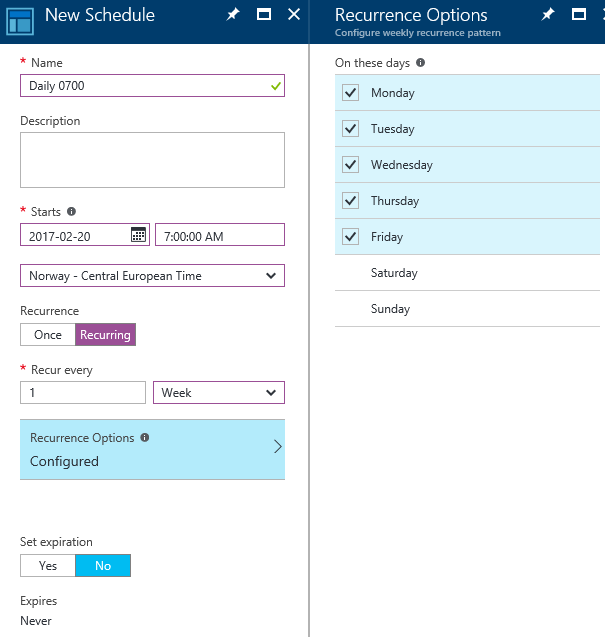
Customize it to suit your requirements and click OK->Create->OK
Close Schedules to go back to the runbook’s main page.
7) Click Start to manually test that the runbook works as intended. Click OK on the prompt as we
do not have any parameters to specify, and we want to run it in a sandbox environment in Azure.
When the Job window opens you can click on Output to show the output from the runbook:
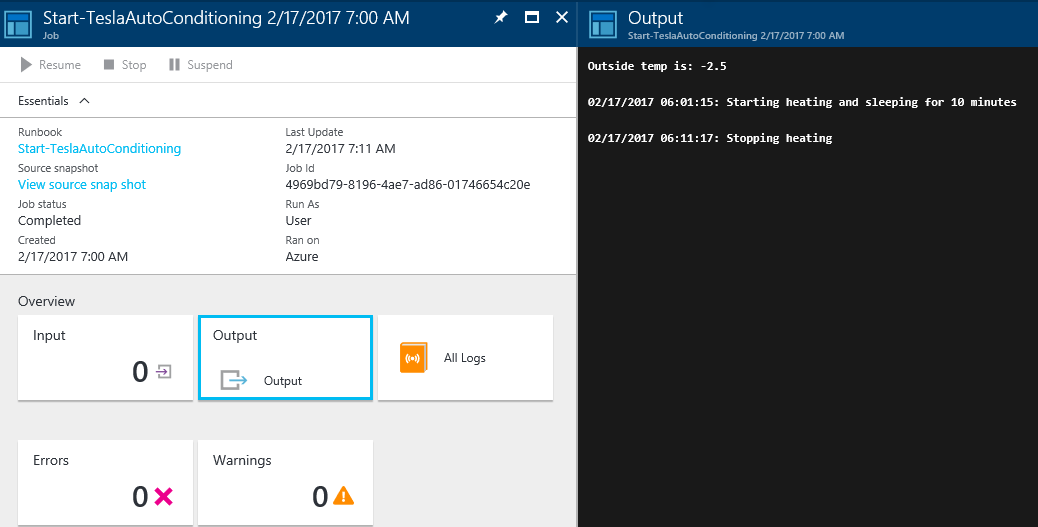
This will show the same output as if you were running the script in a local PowerShell instance.
You can always go into Jobs on the Runbook’s main page to see the job history and go into details
for individual jobs.
Option 3 - others
Scheduled tasks and scheduled Azure Automation runbooks is two examples, but there are a number of
other options available for scheduling PowerShell scripts.
Summary
In this article we have looked at how we can leverage a Tesla PowerShell module to automate starting
and stopping the climate control system. We also looked at different options for scheduling a PowerShell script on a customized schedule.
Did you find this useful or have more ideas on how to expand this solution? Feel free to leave your
suggestions in the comment field below. Maybe you did something completely different?
I’d love to hear about it, even if the solution was not using PowerShell to manage your Tesla.