Introduction to Red Hat OpenShift Container Platform
Introduction
Having worked with Kubernetes for some time, as well as Red Hat Enterprise Linux, I was eager to learn more about Red Hat’s container product - Red Hat OpenShift Container Platform (OCP).
It is part of Red Hat’s containernization software family OpenShift, and based on Kubernetes.
In this post, I am going to share my perspectives based on my learnings so far.
Architecture and core concepts
Based on Kubernetes - the defacto standard for orchestrating containers - OpenShift Container Platform adds additional functionality and features. It is based on Red Hat Enterprise Linux CoreOS as the foundational operating system for the control plane and worker nodes.
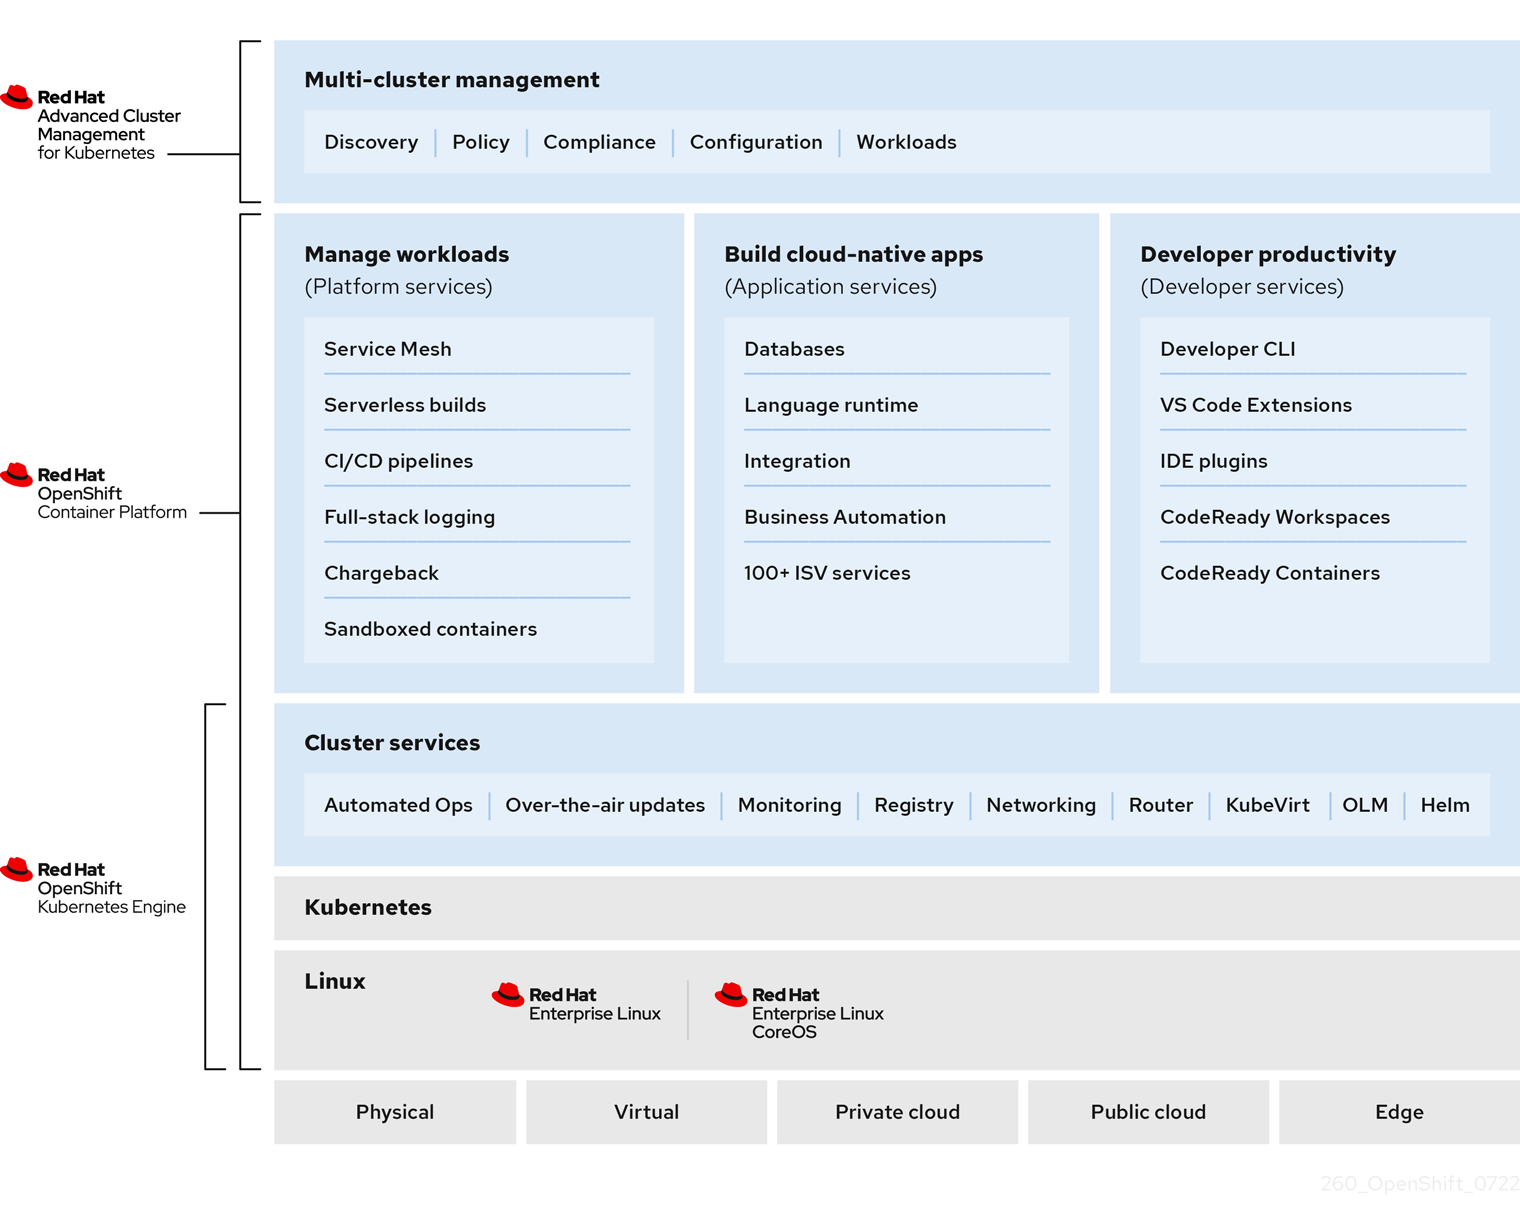
Image credit: Red Hat
Just like Kubernetes, it supports deployment to a variety of targets:
- Physical servers
- Virtual machines
- Private Cloud
- Public Cloud
- Edge
The deployment process for manual installations might be more complex compared to the other options. Ben Weissman have a course on Pluralsight I can recommend - Getting Started with OpenShift 4, which goes through the requried steps.
The easiest way to get started is probably using a public cloud offering, such as Azure Red Hat OpenShift - a highly available, fully managed OpenShift cluster on demand, monitored and operated jointly by Microsoft and Red Hat.
The lifecycle of a Red Hat OCP cluster is described by Red Hat as follows:
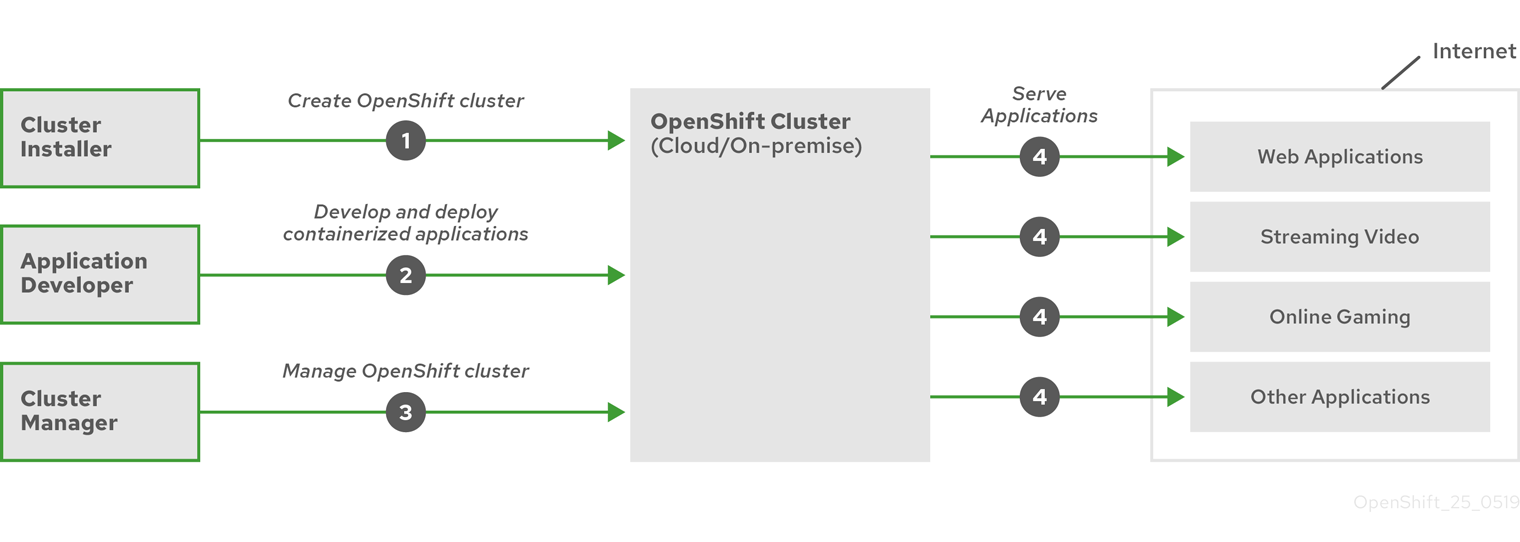
Image credit: Red Hat
When a cluster has been provisioned and is ready for use by developers - which we may see as the users of a clusters - Red Hat OCP have a lof of features making it easier to get started with less plumbing required as we can see in the following section.
Features
Console
A web-based interface provided by the Red Hat OCP cluster that allows developers and administrators to interact with cluster resources.
Project
An OpenShift extension of Kubernetes’ namespaces, which allows the definition of user access control to cluster resources - providing an application or workload isolation from other resources in the same cluster.
Networking
As with Kubernetes - the concept of services enables network access internally between pods in a cluster - and acts as an abstration layer on top of pods and deployments.
External access is provided by resources called Routes. A route is an object describing DNS names and ports external to the cluster (potentially the internet) pointing to a service inside the cluster. A router (the same as an ingress controller) is responsible for forwarding requests (HTTP and TLS) to the service addresses inside the Kubernetes SDN.
OpenShift is by default leveraging HAProxy as its router.
OpenShift relays on a wildcard DNS domain for exposing applications outside of the cluster. When installing a cluster, a name and a base DNS domain is provided. Both of these are used in the wildcard DNS domain for exposing applications:
*.apps.<cluster_name>.<base_domain>.
Example:
*.apps.ocp.powershell.no
When exposing services as routes, the naming convention route-name-project-name.default-domain is used:
oc expose service wordpress
However, this can be overriden if needed:
oc expose service wordpress --name blog
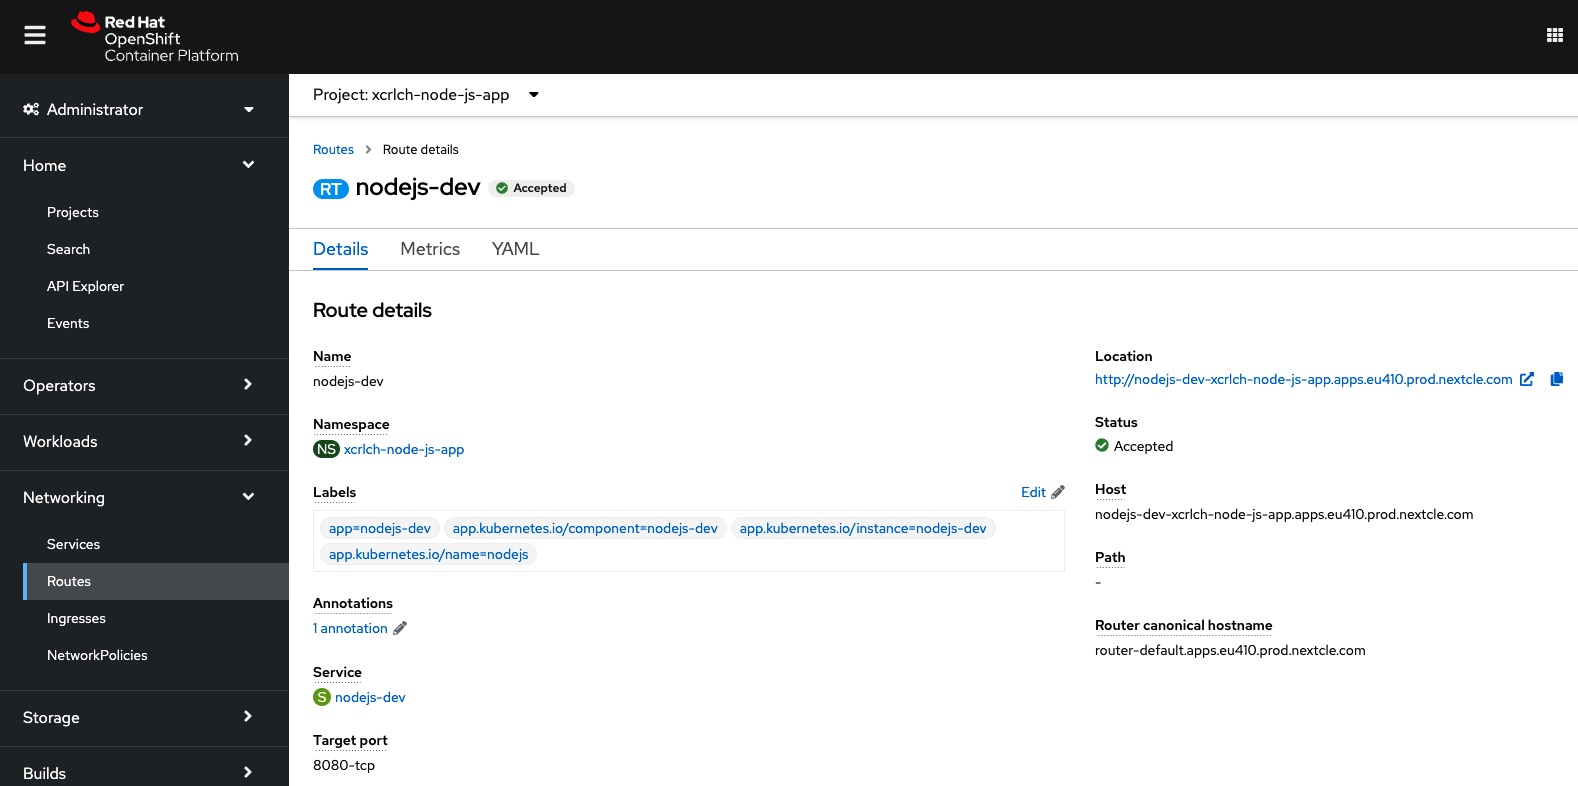
The routes can also be managed via the Web Console if desired:
Registry
As oposed to Kubernetes, Red Hat OCP by default provides an internal container registry for storing and pulling container images from - eliminating the need for provisioning a registry ourselfes.
Continuous integration and continuous delivery
Part of Red Hat OCP is OpenShift Pipelines, a continuous integration and continuous delivery (CI/CD) solution based on Kubernetes resources. It uses Tekton building blocks to automate builds and deployments, which is running in isolated containers.
Source-to-Image (S2I)
This is a tool to make it possible for developers to deploy their applications from source code - without needing any knowledge about Dockerfiles or container images.
Built on a base image - code from a specified Git repository is injected into image and a new image which can run the application is produced by a build pipeline. Several pre-built base images is available, and one may choose based on the language or framework being used in the application being built.
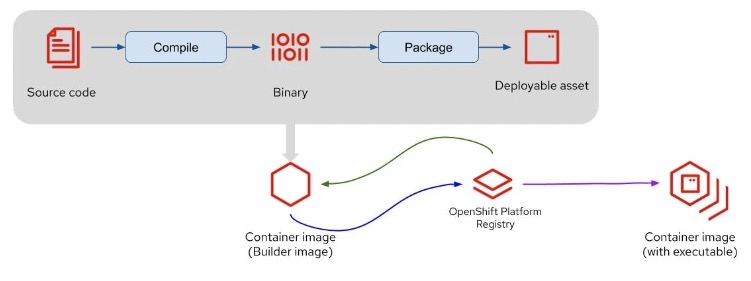
Image credit: Red Hat
Although one might prefer to use traditional methods to build container images based on Dockerfiles, the S2I tool has a number of advantages:
- When the base image has been patched, for example due to a critical security issue, the S2I pipeline can be triggered to rebuild the application image using the updated base image - without the need for any actions from the developer.
- No need for the developer to learn how to install required packages, such as yum install.
- There is a shared ecosystem of base images where customizations, scripts and other artifacts can be shared across organizations
- Efficiency - a large number of complex operations can be performed by the build process, resulting in smaller images with fewer layers.
When leveraging S2I, a BuildConfig where the source (typically a Git repository) is defined is being deployed in the current project along with an ImageStream to track the built images, a DeploymentConfig to create updated images when there are changes either to the base image or the source code, a Service to expose the application inside the cluster and optionally a Route to expose it externally.
The Red Hat OpenShift Container Platform Command-line Tool
While it is possible to use kubectl to interact with the API server, the recommended way is to use oc command-line tool.
Similar to the way podman has mostly the same syntax and sub commands as docker, oc is very similar to kubectl.
Examples of basic usage:
oc <command>
oc login <clusterUrl>
oc get pods
The main reason one should use oc over kubectl when working with Red Hat OCP clusters is being able to manage OCP-specific functionality.
One of the most important ones being the oc new-app command.
This command can create application pods to run on OpenShift in many different ways. It can create deployments from Docker images, from Dockerfiles, and from raw source code using the Source-to-Image (S2I) process as mentioned previously.
oc new-app --help will show the different options available for creating new applications on OpenShift.
Some examples:
oc new-app --docker-image=registry.com/contoso/app1 --name=app1
oc new-app https://github.com/openshift/ruby-hello-world --name=ruby-hello
Alternativly, all of the deployment options is also available in the OpenShift web console.
Operators
Operators is a core Kubernetes concept, which is essentially a “Desired State” mechanism where a controller makes sure that the resources used by the managed application such as pods, services and persistent volumes are configured and running as desired. If not, the operator will take actions to remediate the issue. The Operators are also typically embedded with knowledge of the application by the vendor, so known issues can potentially be remediated without human involvement.
Red Hat OCP leverages Operators to run its entire platform in an autonomous fashion while exposing the configuration through Kubernetes objects.
Built-in is also an embedded OperatorHub, which contains multiple sources:
- Red Hat Operators - Red Hat products certified and supported by Red Hat
- Certified Operators - products packaged and supported by independent software vendors (ISVs)
- Community Operators - Operators from https://github.com/operator-framework/community-operators which can be optionally enabled
- Custom Operators - created by yourself
Common infrastructure
Management tools such as the console and API is part of a common Red Hat infrastucture.
Building on the previous topic of Operators, Red Hat OpenShift Virtualization is a great example of leveraging common infrastructure. It is an Operator based on KubeVirt - a Kubernetes Virtualization technology that makes it possible to run and manage VMs side-by-side with containers. These VMs can be managed both as regular Kubernetes objects via the API as well as via the console:
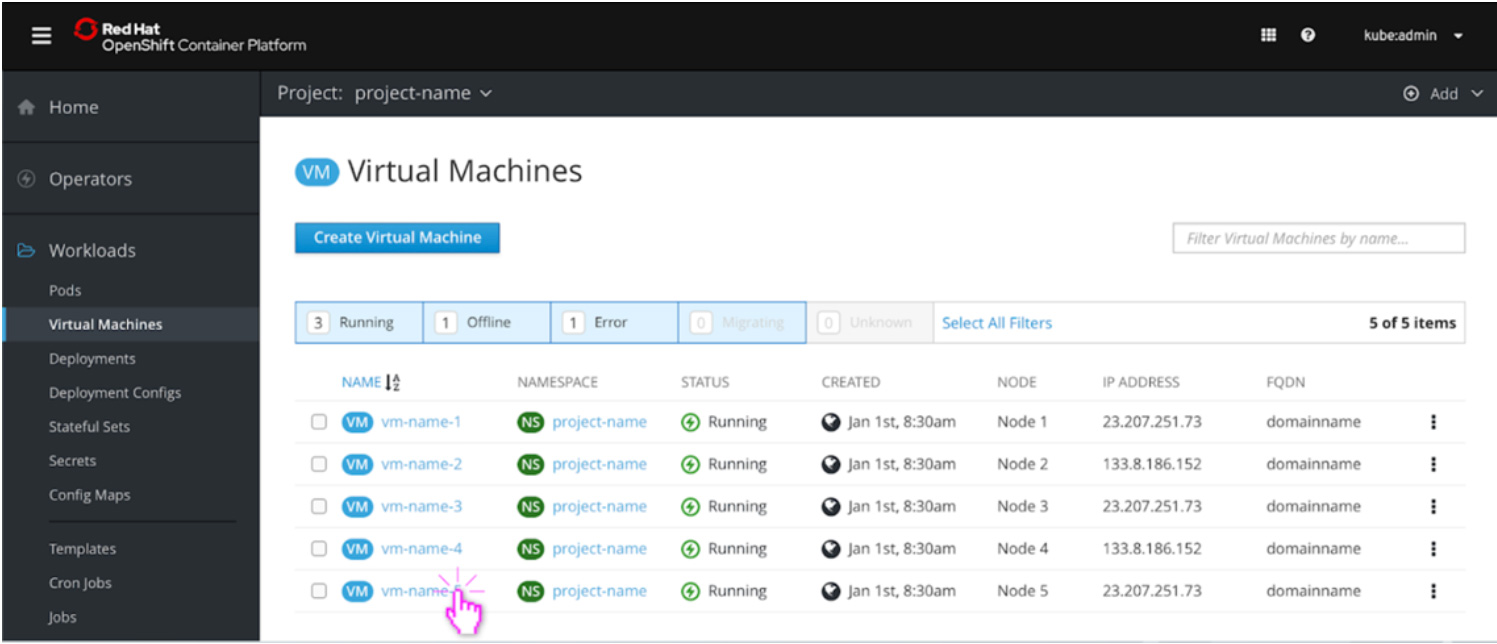
Image credit: Red Hat
Under the hood it is leveraging Linux Kernel-based Virtual Machine (KVM), a Linux Kernel hypervisor, within a container.
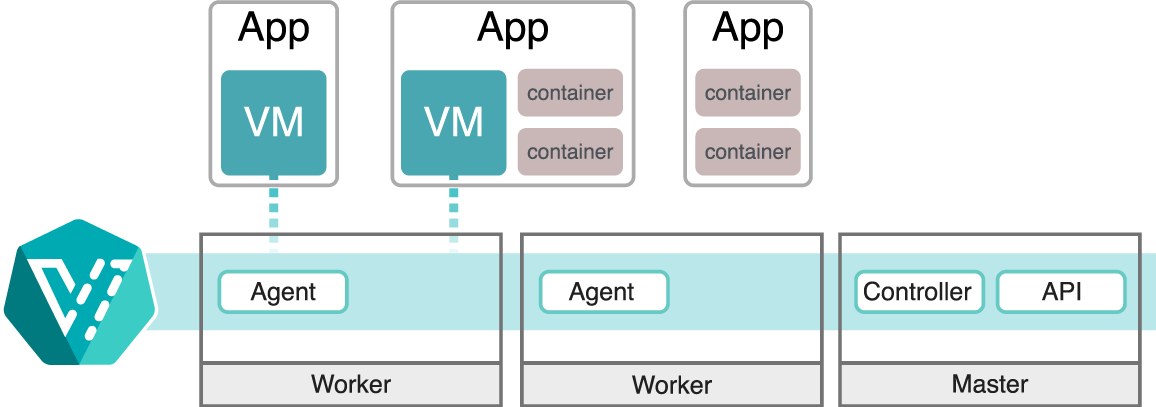
Image credit: Red Hat
This makes it possible to run both modernized container workloads and classic workloads which haven’t or for some reason can’t be containerized - in the same environment.
Monitoring and logging
Red Hat OCP includes a pre-configured, pre-installed, and self-updating monitoring stack that provides monitoring for core platform components. This is based on the Prometheus open source project and its wider eco-system.
A set of alerts are included by default that can immediately notify cluster administrators about issues within a cluster. Default dashboards in the web console include visual representations of cluster metrics.
It is also possible to enable monitoring for user-defined projects, but unlike the core cluster resources - this is not enabled by default.
Learning resources
In order to get an understanding of Red Hat OCP, I went through the course DO180 Red Hat OpenShift I: Containers & Kubernetes. This is highly recommended if you aim to get deeper knowledge and some hands-on experience.
The goal for me in addition to getting hands-on experience was taking the EX180 Red Hat Certified Specialist in Containers and Kubernetes exam, which has the following objectives:
- Implement images using Podman
- Understand and use FROM (the concept of a base image) instruction.
- Understand and use RUN instruction.
- Understand and use ADD instruction.
- Understand and use COPY instruction.
- Understand the difference between ADD and COPY instructions.
- Understand and use WORKDIR and USER instructions.
- Understand security-related topics.
- Understand the differences and applicability of CMD vs. ENTRYPOINT instructions.
- Understand ENTRYPOINT instruction with param.
- Understand when and how to expose ports from a Docker file.
- Understand and use environment variables inside images.
- Understand ENV instruction.
- Understand container volume.
- Mount a host directory as a data volume.
- Understand security and permissions requirements related to this approach.
- Understand lifecycle and cleanup requirements of this approach.
- Manage images
- Understand private registry security.
- Interact with many different registries.
- Understand and use image tags.
- Push and pull images from and to registries.
- Back up an image with its layers and meta data vs. backup a container state.
- Run containers locally using Podman
- Get container logs.
- Listen to container events on the container host.
- Use Podman inspect.
- Basic OpenShift knowledge
- Creating applications in OpenShift
- Create, manage and delete projects from a template, from source code, and from an image.
- Customize catalog template parameters.
- Specifying environment parameters.
- Expose public applications.
- Troubleshoot applications in OpenShift
- Understand the description of application resources.
- Get application logs.
- Inspect running applications.
- Connecting to containers running in a pod.
- Copy resources to/from containers running in a pod.
I found the course to be really well. Getting to start locally on a workstation using podman and creating Dockerfiles (or Containerfiles, as they are called in Red Hat/podman terminology) - evolving the same application to be built highly available in an OpenShift cluster is very useful in order to understand how everything works.
If you do not have access to a Red Hat Learning Subscription with access to their courses, an alternative to get hands-on experience is to set up Red Hat OpenShift Local (formerly Red Hat CodeReady Containers) on your local computer.
Another alternative is the OpenShift Sandbox, which provides 30 days of free access to an OpenShift cluster.
Back to the exam, I did pass on my first attempt (a score of 269 of 300, where the minimum required is 210). However, time management is critical as usual in these hands-on exams where you get access to a virtual machine where all you have is a browser windows with the assignments as well as a terminal. Being stuck on one of the initial tasks really puts pressure on you, and while I was doubtful during the first 30 minutes - I managed to pull it off at the end.
Tips and tricks
One neat trick I learned from the DO180 course was the idea of bringing local tooling into containers during troubleshooting.
I suppose you also have been in a situation where you are opening a terminal session against a container for diagnosing some problem, for example related to networking. Next, you find that basic tools like ping and nslookup is missing. On the smallest images, even tools like ls may be left out in order to minimize the size of the image.
The trick suggested in the course is to temporarily access some of these missing commands by mounting the host binaries folders, such as /bin, /sbin, and /lib, as volumes inside the container:
podman run -it -v /bin:/bin image /bin/bash
Summary
Having seen and experienced the additional value Red Hat brings to the table on top of vanilla Kubernetes has been very interesting, such as learning about the Source-to-Image (S2I) feature.
Especially for those already in the Red Hat ecosystem - it should be a no-brainer on which container platform to choose.
For others, your mileage may vary as always - everyone has different needs and requirements. Regardless, I will for sure bring this alternative to the table in my container workshops.
Useful resources
- OpenShift Command-line Tool cheat sheet
- Openshift Container Platform cheat sheet for System Administrators and Developers
- Visual Studio Code Extension: OpenShift Connector
- Visual Studio Code Extension: Tekton Pipelines (used for S2I)
- Deploying a Windows Server 2019 virtual machine using OpenShift virtualization
- Understanding OpenShift Pipelines
- Red Hat OpenShift support for Windows Containers overview
- OpenShift Container Platform cluster monitoring, logging, and Telemetry
- A Guide to Ingress Controllers for Azure Red Hat OpenShift